
Smoke testing is the practice of running a small set of tests to ensure the basic functionalities of an application or website are working before moving on to other, more comprehensive types of software testing.
For smoke testing to be the most effective, it needs to be completed very quickly so that developers can get fast feedback about the stability of the new build. Manual testing typically takes several hours to complete, whereas a good test automation platform will let you run smoke tests in a few minutes. That’s why most teams end up doing automated smoke testing rather than having someone manually interact with the software to perform tests.
In this tutorial, we’ll teach you how to create a basic smoke testing suite using our tool, Rainforest QA. We’ll illustrate each step with examples from Airbnb’s web application.
Table of Contents
- What is smoke testing?
- How to choose test cases for smoke testing
- Smoke testing vs. other types of testing
- How to automate smoke tests
- How to triage smoke test results
- How to run automated smoke tests for free
Talk to us about how Rainforest can speed up your smoke testing with no-code test automation.
What is smoke testing?
As mentioned above, smoke tests are one of the first set of tests run on a new build to ensure the application as a whole works properly in a production-like environment. The name may derive from the early days of electronic hardware testing. As in, turn on the device for the first time, and make sure it doesn’t catch fire before you do any other testing. In software engineering, the term is metaphorical—you don’t actually expect to see smoke—but you’re still looking for similarly catastrophic kinds of problems.
Many teams move on to smoke testing after a new build has passed integration testing, which makes sure that individual modules of code work in harmony together.
Smoke testing (also called build-verification testing) is typically performed by the developer working on the build before it gets handed off for more rigorous testing. Unlike unit tests, which focus on discrete sections of a new build in the early stages of development, smoke testing comes after a new build is complete and helps catch major bugs that were unintentionally introduced to other parts of the software.
The main advantage of smoke testing is that it can identify major defects in the new build very early in the development cycle, preventing developers and testers from wasting time with further testing or fine-tuning a build that needs to be scrapped.
For example, if a critical functionality like the login process was broken in the new build, nearly any test you run on the software would fail. If you can identify those kinds of flaws with a suite of five to 10 tests, you’ll save a lot of money and test effort as compared to running your complete regression suite (which could include more than 100 tests).
Smoke tests will cover the five to ten major functionalities of the software and will stay the same regardless of what you’re building.
How to choose test cases for smoke testing
Smoke tests should cover the top five to ten user paths that are the backbone of your software. This would include the top few features that nearly every customer uses and/or the important functionalities that, if they were broken, would make it impossible for you to deliver your service (or product) to customers.
Using Airbnb as an example, their smoke tests would include one or two test cases to cover each of the following user paths:
- Searching for a stay
- Reserving a stay
- Messaging a host
- Becoming a host
- Logging in to a personal account

Once you’ve determined which test cases to include in your smoke suite, each test should cover the functionality in the least amount of steps possible. The idea here is to quickly check for major bugs in basic functionalities, so creating long, complex test cases at this stage will only slow down release without significantly improving quality.
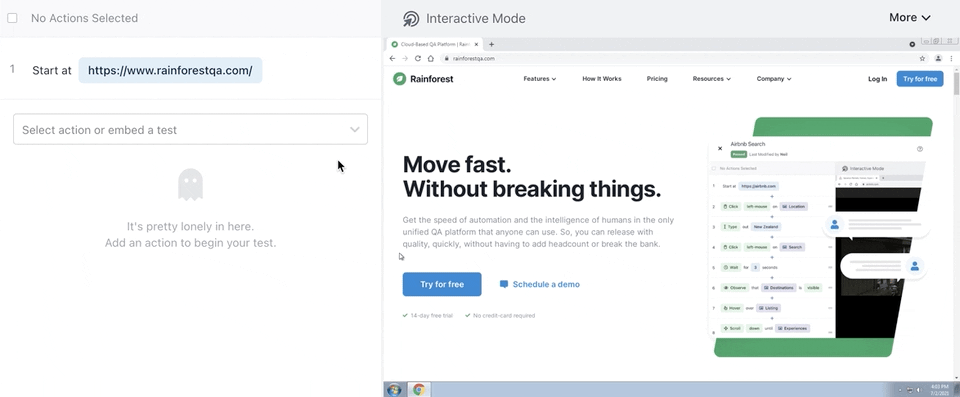
Here’s an example of a short test that covers filtering locations on Airbnb:

Smoke testing vs. other types of testing
Sanity testing and regression testing are two other types of testing that often get confused with smoke testing.
Smoke Testing vs. Sanity Testing
In software testing, sanity tests are a very small subset of regression testing (anywhere from one to ten tests) that cover the new functionality or bug fix. Where smoke testing ensures the application as a whole is still stable, sanity testing verifies the functionality of the specific feature that was added or changed in the new build before moving on to full regression testing.
Unlike smoke tests, which stay the same for each build, sanity tests will change with each new build or bug fix.
Sanity testing isn’t as widely used as smoke testing. In fact, many quality assurance teams don’t include sanity testing as part of their formal testing strategy (although many of them do something that could be called sanity testing). In any case, this type of testing is typically done manually by whoever will be completing regression testing.
Using Airbnb as an example, let’s say there was a bug that made the ‘show map’ button disappear. Once the bug was fixed, a sanity test would check that the ‘show map’ button was visible and functional.

Smoke Testing vs. Regression Testing
Regression testing is typically one of the last stages of the testing cycle and it deals with thoroughly checking the entire application for bugs that may have been introduced by new code.
Regression tests are necessary because of the nature of software development: Changes to one part of an application can often bring about unexpected changes to other parts of the application. Although most developers will do a quick manual check of the part of the application related to the feature they were working on, they don’t have time to manually run through every user path in the application to make sure the change they made didn’t break anything.
While a regression test suite can include 500+ tests for complex applications, it doesn’t usually need to include a test case for every user path. The goal is to check that all key features are still working properly.
To learn more about choosing which test cases to include in your regression suite, read this article on automation test coverage. You can also learn more about software regression testing here.
Returning to Airbnb as an example, the regression suite would likely include test cases to thoroughly cover logging in, searching for a stay, filtering the search, saving stays as favorites, booking, messaging hosts, etc. You will continue to add tests to your regression suite as you add new features to your software.
Smoke Testing vs. Other Types of Software Testing
Smoke testing is one of the first layers of software testing. After an application passes smoke testing, it may move on to other types of software testing, such as:
- Acceptance testing and system testing are two closely related types of testing that deal with verifying that a new software build meets all of the original requirements given by the design team.
- Performance testing is a testing method designed to test system stability under intense demands.
How to automate smoke tests
Smoke tests are typically run more frequently than other types of testing. Many teams, especially those running a continuous integration pipeline, will run their smoke suite once a day or multiple times per day and only run their regression suite once per week.
While it’s possible to do manual smoke testing, most teams will automate their smoke tests because it’s so much faster and easier. All you have to do is start the run and you’ll receive results in a few minutes, rather than waiting much longer for human testers to complete manual testing.
We’ve written an in-depth article about how to automate smoke testing, but here’s an overview of how to write automated smoke tests with Rainforest QA:
To write or edit any test step, you start by selecting an action (e.g., ‘double click’, ‘fill’, etc.) from the dropdown menu. You can also search for a specific action if you don’t see it right away. Then, using your mouse to drag and drop a box, you take a screenshot of the element you want to apply the action to. This screenshot is used to find, interact with, and verify elements on the screen during test runs.
This allows anyone to create smoke test cases without writing a single line of code.
Whenever you’re ready to run your smoke suite (or any set of tests), you can start the run from within Rainforest with just a few clicks. All tests will run simultaneously on our network of virtual machines, returning results in less than four minutes, on average.
You can also integrate Rainforest into your CI/CD pipeline via our API, CLI, CircleCI Orb, or GitHub Action. This allows you to make your Rainforest smoke testing suite into a required checkpoint in your release process, and your CI/CD software will kick off the test run automatically after completing the previous step (e.g. unit testing). We also provide Slack and Microsoft Teams integrations so you can get notifications of test failures wherever it’s most convenient for you.
How to triage smoke test results
Once you’ve decided to automate your smoke tests, the next major consideration is what tools you have available for understanding why a test failed and categorizing failures.
Understanding why a test failed can be very time-consuming without the right tools to help you since it’s not often immediately obvious where the bug is (or if it’s even a true bug instead of a glitch in the system or an obsolete test). When you’re running smoke tests multiple times per day, it becomes especially important that you can triage test results very quickly.
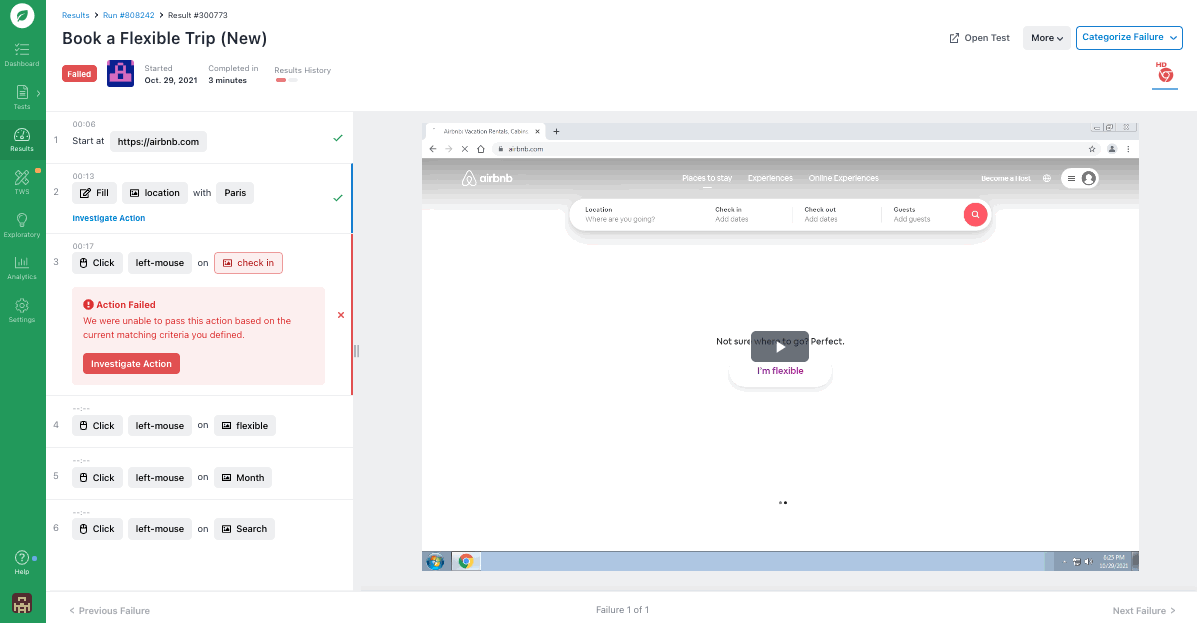
Rainforest QA makes it easy to quickly see what caused a test failure with video replays and detailed logs about how the test was performed and how the test result was determined.
Every test run, whether it passes or fails, gets recorded and stored indefinitely within Rainforest QA. With each recording, you’ll see the test steps on the left-hand side and how the step was executed in a screen to the right.

This lets you compare a successful test run to a failed test run, which is often the key to understanding test failures. Then, you can easily recreate the bug because video replays show you everything leading up to the failure.
If you want to dig into a particular test step, you can click on the ‘investigate action’ button under any test step. This will take you to a new screen with additional details about how the result of that test step was determined.
It’s also easy to see if a test failure was caused by something other than a real bug such as an error in the test itself or an issue with the test environment. To help identify hiccups in the test environment, Rainforest QA also provides HTTP logs and browser logs.
Finally, Rainforest comes with a Jira integration that allows you to automatically create a ticket to send to the development team for bug fixes. The Jira ticket will include the failed test steps, a screenshot of the failed test step, HTTP logs, and a link to the full test results and video recording in Rainforest.
How to run automated smoke tests for free
There are open-source test automation frameworks (such as Selenium) that let you write and run tests for free, however, they typically don’t offer everything you need for ongoing functional testing. For example, most software testing tools won’t provide (or will charge you for) a way to run multiple tests at once. Eventually, most teams end up paying for something.
Note: If you’re still interested in using a free tool, here’s a list of 10 free test automation tools.
Rainforest provides everything you need to write, maintain, organize and otherwise manage your QA testing including:
- Easy test suite management (including folders, tags, and filters).
- A network of virtual machines to run multiple tests at once.
- Access to multiple operating systems and browsers for testing, including current and older versions of Chrome, Firefox, Internet Explorer, etc.
- Built-in test data like randomized email addresses, credit card numbers, names, etc.
- And much more.
Talk to us about setting up a Rainforest plan that fits your needs.