

A test plan outlines the objectives, methods, organization, and success criteria for testing a specific feature of a web application or other software project.
A good test plan contains all the information you need to write automated tests and will help direct your efforts so you don’t waste time creating unnecessary tests.
Here is the test plan template we use with our clients.
To use this template yourself, simply:
- Open the document, and click on the tab marked “Template – MAKE A COPY”.
- Click on the down arrow next to the tab label, and hover over “Copy to”.
- Select “New spreadsheet”.
- From there, you should be able to open a new blank copy of the spreadsheet within your Google Docs Spreadsheets.
(If you need the Functionality Map as well, make a copy of the whole document and then delete the Slack example features from both the Functionality Map and the New Workspace tabs.)
Below, we walk through how to use the template and six steps for creating a test plan:
- Develop a testing strategy.
- Create a functionality map.
- Define pass/fail criteria.
- Write test descriptions.
- Define test organization standards.
- Create rules for failure categorization and bug classification.
Talk to us about setting up a Rainforest plan that fits your needs.
1. Develop a Testing Strategy
We’ve written an entire article around just this first step because it lays the foundation for your functional testing program. You can read the article here.
The short version is that a testing strategy deals with big picture goals and how to achieve them, whereas a testing plan deals with the actual test procedure. It defines things like the scope of testing, test design standards, the testing environment, and other tactical aspects of testing.
A test strategy includes:
- Defining your goals.
- Assigning testing responsibilities.
- Deciding what tests to automate.
- Deciding when to do functional testing.
- Choosing a test automation tool.
The last step—choosing a test automation tool—is particularly important before writing a test plan because the tool will determine how easy it is to write test scripts, who can help out with test maintenance, and who needs to be involved at what stage in the testing process.
When choosing a test automation tool, you essentially have two options: code-based web automation frameworks like Selenium that require programming skills to use, or tools that allow users to create tests with some kind of no-code user interface.
Most of the tools that call themselves no-code test automation tools are actually just an easy way to auto-generate Selenium code. Selenium is known to have many drawbacks when it comes to functional UI testing, but one of the biggest ones is the technical barrier to entry. Working with Selenium requires a full set of programming skills, and even the best no-code tools that generate Selenium code eventually require software engineers to step in and set up more complicated tests and troubleshoot any problems.
Rainforest QA is the only no-code automation testing tool that lets you write, run, and maintain tests without writing a single line of code.
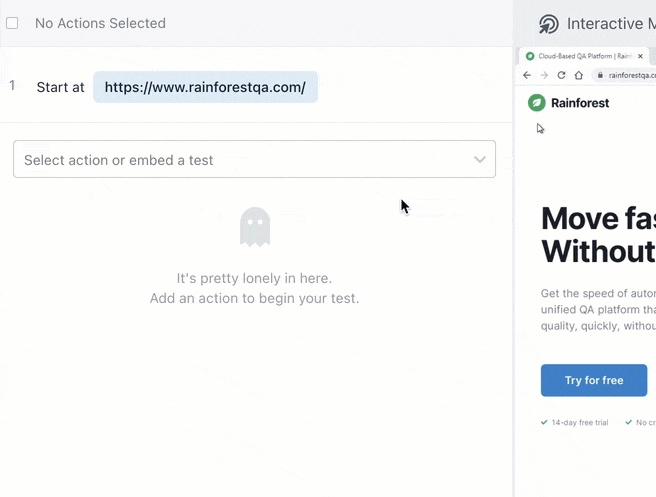
In Rainforest’s visual editor, you can choose from a dropdown menu of preset actions (such as “click”, “select”, or “type”). Then, you click and drag the cursor to take a screenshot of the element you want to apply the action to.
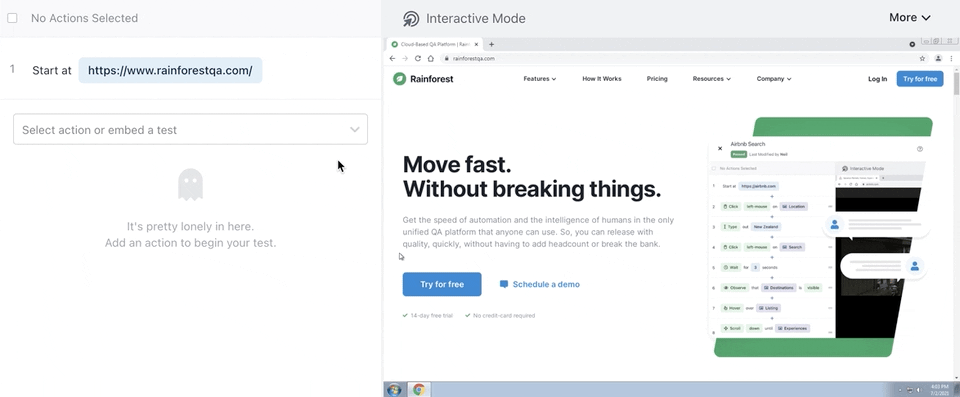
Once you’ve created each action for the functionality you want to test, you can replay the actions you’ve created to verify that the test will do what you’ve intended.
Because anyone can write Rainforest tests, non-technical stakeholders and team members can step in to help get a bunch of tests started right after you’ve created your software test plan.
Here are just a few of the additional benefits Rainforest QA offers that make it easier to implement your test plan:
Test What the User Sees Instead of What the Computer Thinks They See
Rainforest tests what your users will actually see, rather than what the computer thinks users should be seeing.
This is because Rainforest tests use pixel-matching to verify that an element is visible instead of searching for locators in the underlying code, like most test automation tools.
For example, if you wanted to validate the presence and content of a confirmation message via a code-based automation testing tool, you would need to create separate assertions to test: Is the element visible? Does it say what I want it to say? Is it the correct color? Is it the correct size? And so on.
With Rainforest tests, all of this gets automatically tested with pixel-matching, and the tester only has to take one screenshot. This saves a lot of time when writing tests.
Test Automation That Doesn’t Break with Minor, Behind-the-Scenes Code Changes
By testing the visual layer of the application, Rainforest automated test scripts are less susceptible to breaking due to minor code changes that don’t affect the UI—unlike tools that test the underlying code (like Selenium, Cypress, or Katalon).
If you’re using a testing tool or framework that tests the underlying code, you could run into a variety of situations where the test might fail even though the UI is flawless.
For example, if the CSS class of the button changed from “try for free button” to “tryforfreebtn2,” a Selenium test could break, but a Rainforest test would not—as long as the pixels of the button on the page didn’t change.
A Rainforest test would fail only if the actual visual appearance of the button changed. For example, if the button was accidentally hidden due to a bug in a recent code push, the test would (and should) fail.
An All-in-One Solution with Usage-Based Pricing
Rainforest QA is an all-in-one UI test automation solution, which means it includes everything you need to create, run, and manage any number of automated tests. You don’t need to pay for additional things like a cloud-based testing grid, project management tools, and team collaboration tools just to manage your automation efforts.
All Rainforest QA plans include:
- A built-in “test grid”. The Rainforest platform includes all the infrastructure you need to run tests. All tests run on virtual machines in our cloud, including 40+ configurations of platforms and browsers.
- Parallel test execution. No matter how many test cases you run at a time, they’ll run simultaneously, getting you fast results.
We offer usage-based pricing, rather than capping the number of concurrent tests you can run on a given pricing tier. You can scale testing up or down as needed, without having to make an expensive upgrade to any of your testing infrastructure tools.
2. Create a Functionality Map
You may already have a functionality map for your application, which identifies the most important features of your application and ranks them by priority.
If you do, you can skip this step.
If not, you can refer to the first tab of our test plan document to see our example functionality map for an early version of the Slack web app.

For most web applications, it’s not practical or feasible to test every single user path through an app.
Instead, you should focus your testing efforts on the most important user paths. We like to use the analogy of a snow plow clearing a city’s streets after a snowstorm. The streets that see the most traffic get cleared first, and some of the side streets may never get cleared because so few people travel on them. This ensures the most important parts of your app will work for the majority of your users.
To identify the most important user paths, start by listing the most basic features of your app under the ‘Primary Functionality’ column on the attached template. These will be the group names that all other tests are organized under.
Next, under the ‘Secondary’ column identify the basic functionalities for each of the features in the first column. You’ll write your first tests for each of these functionalities—this is your smoke test suite.
Smoke tests: Tests that run through the most essential user paths to make sure the application is stable enough to move on to further testing.
The ‘Tertiary’ column is for additional functionalities that go beyond the basics. In the Slack example above, the most basic functionality under the ‘Channel’ feature is to create a new channel. Once you know you can create a new channel, you can start testing whether or not you can add additional channels and move back and forth between channels. These tests will make up your regression test suite.
Regression tests: Tests that check the overall functionality of a product after new features have been added to make sure the latest changes didn’t introduce new bugs or break any existing functionality.
Finally, the ‘Negatives’ column would include low-priority edge cases that should only be included in your regression suite if you’re already covering everything in the Tertiary column.
By following this setup, you’ll be testing the functionalities of individual features before testing how these features interact with each other. This helps you understand the complexity of your application as a whole and helps your team focus their efforts.
3. Define Pass/Fail Criteria
The first column on the second tab of the test plan document is where you will write the title for each test (we like to name tests with the feature group and the functionality being tested).
The second column is where you write the objective of the test. Another way to think of the objective is that it determines the pass/fail criteria.

The objective of the test is the desired outcome (a pass). If this outcome isn’t achieved (a fail), it means there’s a bug in the system or a break in the test.
The more specific and concise your objective, the more effective your tests will be. You should be able to convert your objective into a question with a simple yes or no answer (i.e. when the user clicks the ‘add to cart button’ does the item appear in their cart?).
If you try to test too many functions in one test, you’ll end up with tests that take longer to run because features are being tested one after the other instead of simultaneously (assuming you’re using a testing platform like Rainforest). The longer it takes the test to run, the more time you’ll spend sorting through test results to understand failures.
These small decisions could be the difference between a test that takes 45 seconds to run and a test that takes 90 seconds to run. This might not seem like a big deal, but when you’re running a suite of 100 tests (let alone a suite of 500 tests like some of our clients) that’s a difference of 75 minutes.
4. Write Test Descriptions
The third column is where you can write out a description of each step of the test.
By writing out each of the testing tasks, you’ll be able to identify dependencies and determine whether the test is best suited for automation or manual testing.

To write a detailed test description, you’ll want to think about:
- What needs to be included in the test environment to run the test (i.e. dependencies)?
Continuing with the Slack example, if the objective is to verify a user can send a message, then there must be two user accounts in the workspace.
- What steps will you need to set up the test state with the needed dependencies?
There are two ways to get a test into the state you identified in the previous question: You can either create seeded states or include additional steps in the test description. Seeded states allow testers to log in to an account where specific actions are already complete.
With a seeded state, the test can start at the part of your application you need to test. Building off of the above example, the seeded state would be the existence of a workplace with two user accounts.
Setting up seeded states takes a little extra time during test creation, but it can save a lot of time during test execution, because the only other option is to include all of the steps to add two users in the test, which will extend the run-time of the test.
- Does this test need a reset step at the end?
For example, if you want to verify that you can activate a user, the user first needs to be inactive. If the last step of your test is to set the user back to an inactive state, the test environment will be ready the next time you want to run the test.
- Does this test include steps that can only be performed by a human?
For example, a feature may include verifying a CAPTCHA. If it does, make a note that this test needs to be run manually. With just the click of a button in Rainforest, you can choose to run tests with automation or with human crowd testers.

- Does this test cover just one feature?
Testing only one feature with each test will reduce maintenance while speeding up failure identification and debugging.
- Does this test have too many steps?
When writing tests for the Rainforest crowdtesting community, we recommend only writing 20 steps per test. This is a good proxy for most tests: If your test is more than 20 steps, the test is probably covering too much of the app and would be more efficient if broken into smaller tests.
In our experience, tests longer than 20 steps have a 40% higher chance of failure. Automated tests can include more steps, however, it’s still best to use embedded tests (more on those below) when possible and take the most direct route for fulfilling the test objective without testing any side features.
Most automation tools offer some features to help speed up writing tests and test maintenance.
Here are a few of the features Rainforest QA offers to help speed up the test writing process:
Use Embedded Tests to Speed Up Test Writing and Maintenance
While writing your test descriptions, you may start noticing test scenarios that are repeated a lot.
In Rainforest QA, you can use embedded tests for these repeated test scenarios so that you only have to write the test once.
For example, if multiple tests use the same sign up sequence, you can create just one test for signing up, and embed that test in every other test that requires a login step.
Here’s an example of how we embed a ‘Rainforest Signup Flow’ test into another test (it includes every action from clicking the ‘Try for Free’ button through verifying that a ‘Successful’ message will appear):
If any steps in the signup flow need to be updated (due to a product change), we can update the test in just one place and it’ll automatically be updated in every single test that has the “Rainforest Signup Flow” test embedded in it.
This saves a ton of time on test maintenance.
Use Text-Matching to Make Tests Less Brittle
Text matching examines the text content of an element rather than the appearance.
For example, the buttons below both say “Buy Now” even though the colors and shapes are different.

If text matching is enabled, the test will pass with either version of the button. If the text locator is not enabled, it will only pass if your original screenshot matches the version being tested.
When writing test descriptions for Rainforest tests, it’s helpful to indicate whether a test should allow text-matching, or if it needs to look for an exact visual match.

5. Define Test Organization Standards
Test organization (sometimes called test management) is covered by the last several columns of the template and includes:
- Who is responsible for writing the test?
Assigning an owner at this stage is only about who will be responsible for actually writing the test script. Assigning other testing activities such as running and maintaining tests long-term is covered in the test strategy.
- How high of a priority is the test?
If you don’t have time to run all of your tests before release, knowing the priority level of each test will help you decide which tests to run first.
- Which tests are part of the same group?
Groups can be defined using tags—or identifiers—according to: (1) the groups listed in the “Primary Functionality” column mentioned earlier, (2) the type of testing (i.e. smoke testing, regression testing, system testing, acceptance testing, performance testing, etc.), or (3) any other criteria to accommodate your testing team’s workflow.

Marking the priority level and assigning tags are part of the test writing process in Rainforest QA. This allows for a more flexible test schedule. You can select one testing type—all tests with the ‘Regression’ tag or all priority one tests for example—and run them simultaneously without individually selecting and running each test.
6. Create Rules for Failure Categorization and Bug Classification
The last step of the test plan is about determining how your QA team will handle failed test results.
Failure Categorization
Anytime you get a failed test result, you have to figure out if the test failed because the test is broken, there’s a bug in the system, or for some other error. This is called failure categorization.
Each team will have a different way to categorize failures. You’ll need to decide what categories you want to use and write a description of the category so there is no confusion about which category a test failure belongs in.
A few of the categories we recommend are:
- Bug: An issue that needs to be addressed because the feature or function doesn’t work as intended.
- Known Bug: A bug that was previously identified.
- Needs Refactor: The test needs to be updated (rewritten) to match the tested functionality.
- System Error: There was a connectivity issue or incorrect test data.
Rainforest QA makes it easy to understand why any test fails by recording a video of every test (even ones that pass).
Within the test steps, you can see what action failed and why because the action gets highlighted in red and a brief message appears stating the reason it failed.
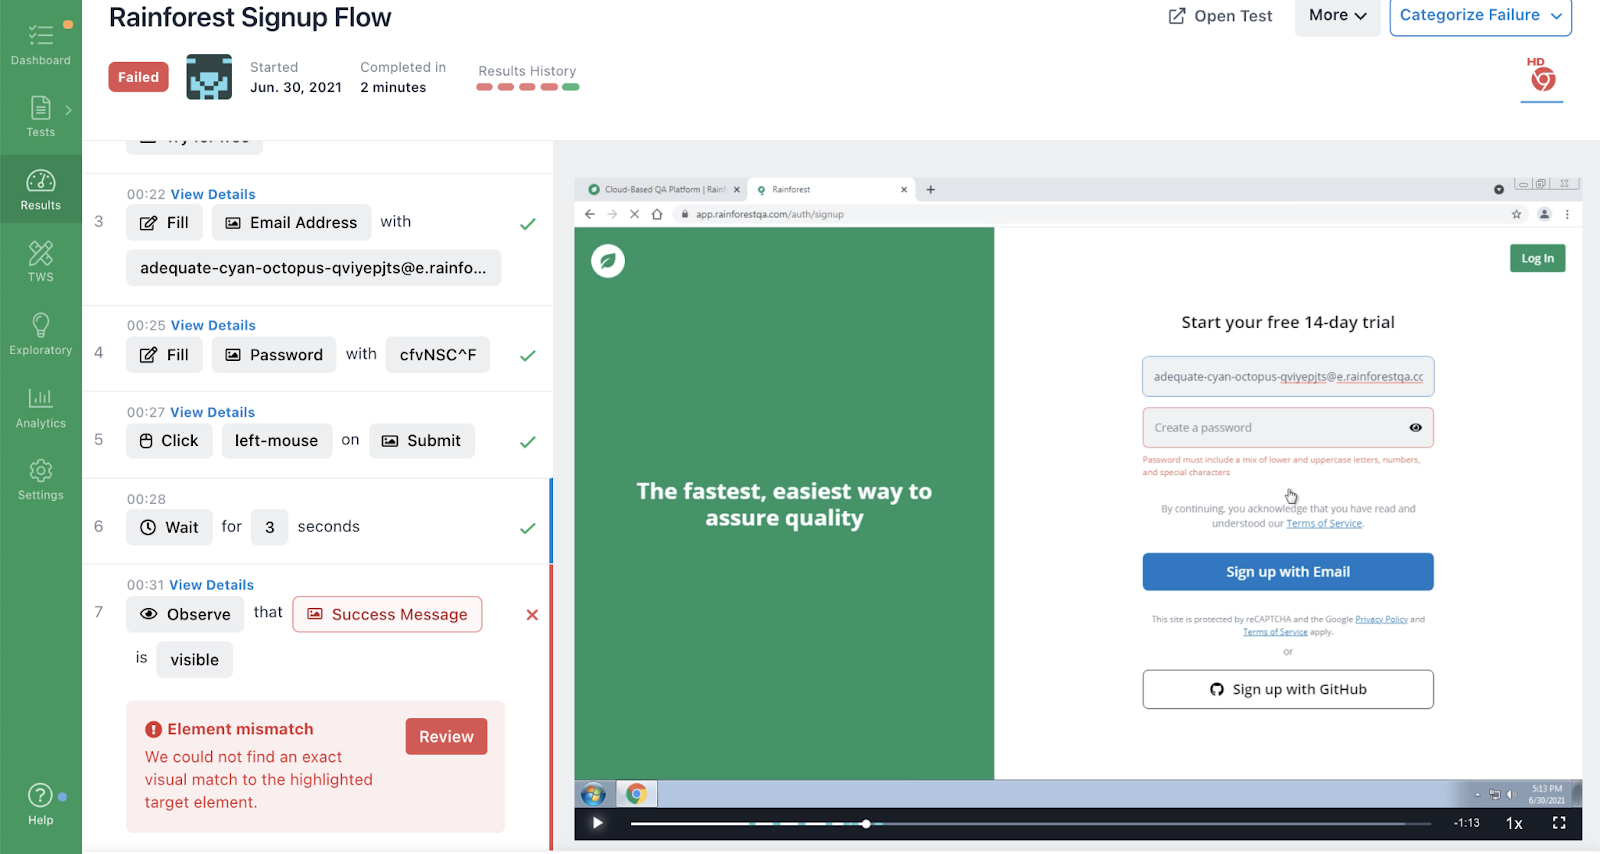
This allows you to see how the application performed without having to recreate the exact situation.
Then, you can easily mark the failure categorization for each test.

Rainforest stores this information so you can easily create test reports from your dashboard. You can have these reports automatically sent to your email so you can stay up to date on every test phase.
Another best practice related to failure categorization is deciding what to do with tests that need to be rewritten (the “Needs Refactor” category). Your team could prioritize fixing all broken tests immediately before running the suite again, or you could choose to quarantine broken tests by removing tests that were labeled “Needs Refactor” from future test suites until they can be rewritten. Just make sure you get around to rewriting them soon, or else your test suite will become less and less reliable.
Bug Classification
Bug classification is about setting metrics that determine how likely it is that the bug will affect your bottom line or reputation. Criteria are based on the probability of users running into the bug and how much damage the bug will cause if users do run into it.
Each company has a different testing approach and tolerance for bugs based on a variety of factors, including the industry, the expectations of the users, and the competitiveness of their market segment.
In some industries, minor bugs might be so damaging to a company’s reputation that it’s worth delaying releases by several weeks in order to fix every bug.
In other settings, it’s much more important to get a requested feature into customers’ hands by a certain deadline, even if it means fixing a few minor bugs after release.
Either way, it’s important to determine bug classification criteria so you can work on the major bugs first.
Set Up Integrations to Get Alerts for Test Results
Last, you’ll need to determine how failed test results will be sent to the development team.
Rainforest QA offers plugins to integrate with various software development tools. For example, you can integrate with Jira and send failed test results to developers automatically, including the relevant test result video recordings and HTTP logs.
Developers can also use our API or CLI to kick off a suite of Rainforest UI tests along with unit tests and integration tests in a CI/CD pipeline.
Put Your Test Plan to Use with Rainforest QA
Rainforest is a scalable, all-in-one quality assurance solution that’s appropriate for small teams just getting started with automated testing projects or QA-mature teams regularly running 500+ quality software tests throughout the development life cycle.
Our Essentials plan makes software test automation accessible to anyone. This plan has everything you need to get started with automated testing—parallel testing on virtual machines and unlimited team members—without any hidden costs.
Talk to us about setting up a Rainforest account.