

If you’ve got an agile team interested in shipping fast without breaking things, this post is for you.
In this piece, I’m going to explain how we at Rainforest QA approach automated testing in a continuous integration / continuous delivery (CI/CD) pipeline, with a focus on end-to-end (e2e) functional testing. The aim of our testing and other DevOps methodologies is to maintain a healthy balance between speed and product quality.
We’ve built a no-code test automation platform designed for CI/CD and we dogfood our product every day, so we think about this topic a lot. Plus, we’ve seen what software testing practices work – and don’t work – for hundreds of our customers, so it’s fair to say we’ve got an informed perspective.
Specifically, I’m going to cover each of the four core testing processes involved in managing an automated test suite within a CI/CD pipeline:
- Adding tests
- Running tests
- Test maintenance
- Debugging test failures
But first, it’s worth noting that the model of ownership of automated testing within software development teams has changed in recent years, which changes how to think about who in your org owns each of these four processes.
Who owns the automated test suite?
With traditional automated testing tools like Selenium or Cypress, you’d need to hire or allocate someone with the right technical skills to work within those frameworks. That person would own all aspects of creating, debugging, and maintaining tests because they’d be the only ones with the expertise – and, therefore, responsibility – for doing so.
But the person with the expertise isn’t always the person who’s in the best position in the software development or CI/CD process to take action. For example, developers are in the best position to update breaking tests because they’re the most familiar with the details of each release. In many cases, they can quickly look at a failing test and know exactly what broke it.
In a traditional test automation model, though, they’d have to communicate back-and-forth with a quality assurance engineer doing the debugging. This slows things down – which is bad when you’re trying to ship!
On the other hand, when you’re working with a no-code solution like Rainforest, you can assign testing responsibilities based on what makes sense for your software development process. (For us, that includes not having a QA team nor any conventional QA tester roles since we believe product builders should own quality.)
For the purposes of this piece, we’re going to assume you’re using a no-code automation tool like Rainforest so you have the flexibility to assign testing responsibilities to the best-suited roles. Even if that’s not the case for you and your team, you should still be able to learn from the underlying principles we follow.
Here’s how we’ve set up automated testing within our CI/CD pipeline here at Rainforest, including our underlying DevOps principles, pro tips, and owners of each part of the testing process.
Adding tests
You can’t add new end-to-end (e2e) tests to your suite in an ad hoc way and expect to somehow get sufficient coverage of your most important features. It requires proactive planning.
Test planning
For new features, the relevant product squad defines new e2e test coverage during the feature planning process. In fact, feature planning isn’t considered complete until test coverage is defined.
Given the coverage that already exists, the squad identifies new coverage that’ll be needed. User flows and mockups guide most of this discussion for the new feature.
The squad also determines where the tests will live within the structure of the test suite, since keeping the suite organized makes a lot of steps in the testing workflow easier.
Finally, the squad considers if new functionality will replace old functionality, in which they’ll need to remove or modify some existing tests. (In the Test Maintenance section, we’ll cover an easy shortcut for identifying tests that need to be updated.)
Who adds tests to the suite?
During the planning phase, the squad also determines who’ll handle adding the new test coverage. Ultimately, the decision is guided by determining who has the bandwidth and the required context to author the tests.
Usually, the product manager (PM) or lead developer on the squad is responsible for adding the tests. (The developer handles updating / removing tests – i.e., test maintenance – which we’ll cover later in this piece.)
If it’s a large feature getting shipped that requires a lot of new coverage, the squad will usually share the work across its members: the PM, developer(s), and designer. Using a no-code tool means we can share the workload – even with non-technical team members – to get it done more quickly.
When to add test coverage
As far as when to add new tests, the key is to do it before code makes it to your users. Even though the value of this approach might be obvious – you want to make sure new functionality works properly before your users see it – it’s not always followed, especially in the eagerness to ship.
Depending on the configuration and policies of your CI/CD pipeline, there are several different ways you could add test coverage to new code before it reaches users. We tend to use one of these three methods:
- Run tests against a code branch
- Add a manual approval step before release to prod
- Ship code behind a feature flag
1. Run tests against a code branch
This approach requires that you can deploy code to a specific environment (like QA) and can run your automated tests against that environment. Which means, for example, test data (like usernames and passwords for fake accounts) should be available to that environment.
On our team, we create a branch in Rainforest to stage our new and updated tests. Once these tests pass when run against the analogous code branch, we merge them both so our test suite stays in-sync with our code repository’s main branch.
A nice thing about this approach is that it doesn’t require blocking the release pipeline while we work on updating the test suite.
2. Add a manual approval step before release to prod
In our pipeline, we run our suite of automated Rainforest tests as a blocking step before pushing to prod. Once the pipeline reaches the point of test execution, we pause it to give us a chance to make any updates to the suite.
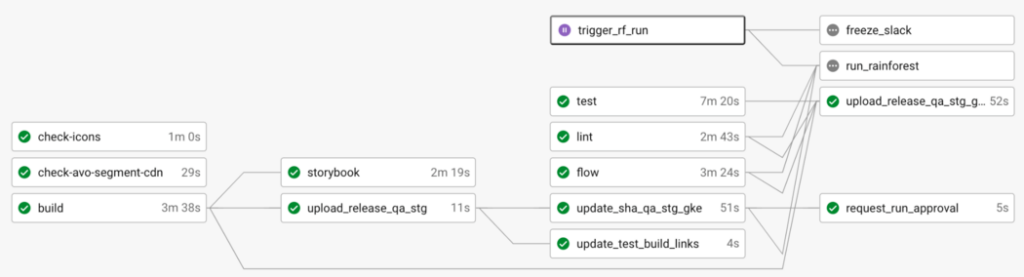
In this diagram of our CircleCI pipeline, notice that trigger_rf_run is paused – it requires manual approval. At this point, any new code has been moved to our staging/QA environment (which happened in the update_release_qa_stg step), where we can update our tests. When that’s done, we manually resume the process.
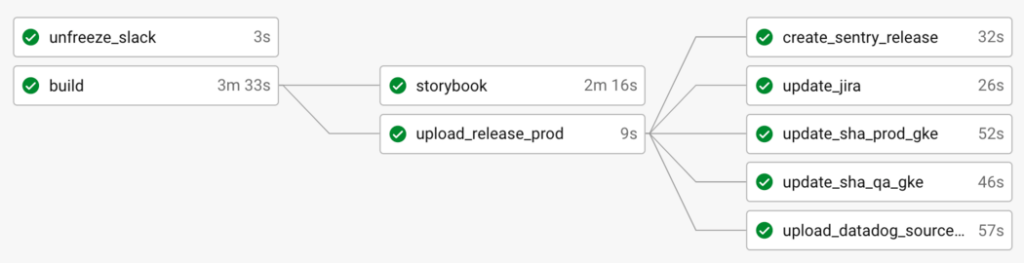
Once the updates give us passing test results, the code is moved into the next step of the pipeline which creates a production build and ships the code to production:
This approach gives you an easy way to control when code is pushed to prod without adding any meaningful overhead. Setting up a manual approval step can be as simple as adding a single line to the configuration of the CI/CD tool you use in your software development environment. For example, CircleCI requires adding “type: approval”. In Jenkins, you can add manual approval steps with the Pipeline: Input Step plugin.
3. Ship new code behind a feature flag
In this approach, we push to prod, but hide new code from users behind a feature flag until we’ve had a chance to update our tests.
How you use this technique will depend on how your feature flags are implemented. At Rainforest, to test code protected by a feature flag, we have to add some seeds to our database. That is, we need login credentials for a fake user that has this feature enabled. We can then write tests against this login and add it to our test suite. Once the flag has become generally available, we remove the feature flag code and database seeds.
Other time-saving guidelines for adding tests
One of the best ways to avoid creating unnecessary slowdowns and pain for your team is to avoid adding more tests than you really need. Tests are expensive in terms of maintenance, which many teams learn the hard way. So, even though it can be tempting to test all the things, don’t add more tests to your suite than you can reasonably afford to maintain.
Follow the Snowplow Strategy to prioritize your test creation, and – as a rule of thumb – don’t don’t create tests for functionality you wouldn’t fix right away if it broke.
Finally, keep each of your tests as short as possible. When you keep the scope of each of your tests as finite as you can, you’ll find they finish more quickly and are easier to debug and maintain.
Running tests
Who runs the automated tests?
If you’re running a CI/CD pipeline, running e2e regression testing is presumably a step in your release process. (If it’s not, it should be.) In which case, running tests happens automatically in every release. There’s no “who” involved, unless you count the developers on the team, who (typically) own the release process itself.
Note: while many teams call it the “master branch,” we here at Rainforest call it the “main branch,” so that’s the vernacular I’m going to use in this piece.
When to run tests
We don’t want to run e2e tests every time we’re pushing or merging code – that’d be overkill and would bog down the pipeline at some point. We mostly think about this in terms of these two scenarios:
- code is not being merged to main or released to production, or
- code is being merged to main or released to production.
To help elaborate, here’s a simplified diagram of our CI/CD environment-based workflow. All non-production environments are replicas of production – they have their own url, database, server, etc, that are all configured to be as close to production as possible, with some differences in how data is added.
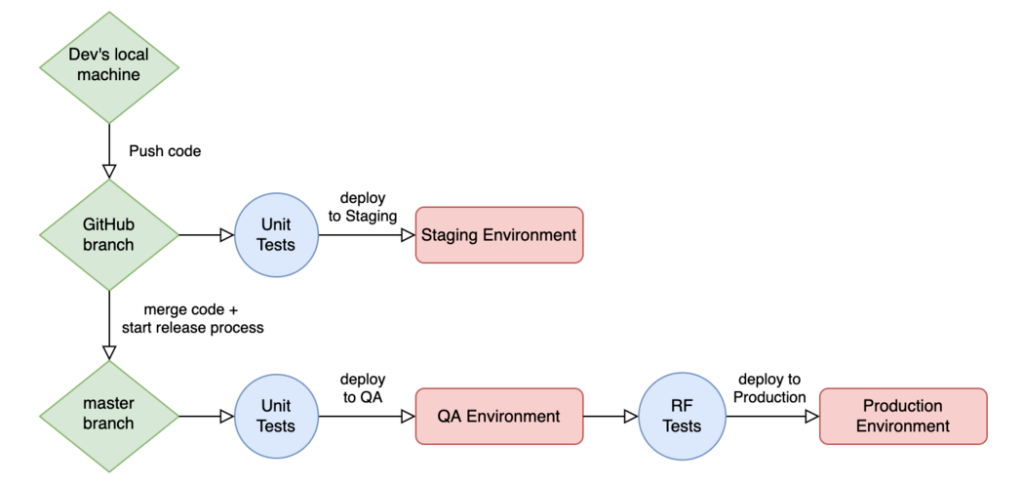
Code is not being merged to main or released to production
This scenario is the most common. We constantly push code to different branches, merge non-main branches together, and all the other operations that occur in a typical version-control workflow.
This is the first step in the diagram: Dev’s local machine pushes code to some GitHub branch. At this point, it doesn’t make sense to run e2e tests because we know they’ll likely fail – code on non-main branches is very often in a broken or incomplete state. Relatively speaking, e2e testing is more expensive in time and money than, say, unit tests, so it wouldn’t be a good use of resources to run them at this stage.
So, at this stage, we run very fast and almost-free checks on non-main branches, including things like type checking, linting, and unit tests. We deploy this code to our staging environment once all the checks pass, which allows non-devs from the product squad to do any manual testing or exploratory testing (like we do when we’re releasing a big new feature).
Code is being merged to main or released to production
When it’s time to start the release process, we merge code to the main branch, which kicks off a special workflow. This workflow includes all the checks from the previous scenario, plus additional steps: once those checks pass, we kick off an automated e2e test run. If all the tests pass, then the additional deployment steps (create a production build, deploy it to production servers, etc.) happen. At this point, we’re confident our release contains no new bugs since we trust our test suite to catch any issues.
It’s worth noting that it’s always good practice to tie your e2e test run to a release ID of some kind. For most teams this is the commit SHA of the pull request being merged to main, but it can be any unique identifier that your team uses. This practice allows you to quickly identify which chunks of code are responsible for test failures.
Scheduled tests
In addition to the e2e tests we run in the release process, we also schedule tests. We have a smoke suite of automated tests that run daily in production to make sure important flows in Rainforest get frequent tire-kickings – we make sure the app is up and that it’s behaving as expected. We also have scheduled tests for our marketing site (which is separate from our core application).
Test maintenance
The easiest way to identify which tests need to be updated is by running the automated test suite in the release process. This’ll reveal which tests have broken as a result of product changes in the release.
Who’s responsible for test maintenance?
At Rainforest, developers are responsible for maintaining our automated test suite.
Anyone on the product squad should know the user flows of the feature, but the devs ultimately know the most about the exact code being shipped and have other helpful context. For example, maybe a test failure was caused by a data seeding issue in the staging environment – that’s easy for a dev to recognize, but more difficult for a non-dev to figure out without some investigation.
That’s why devs are in the best position to unblock the process by bringing broken tests into a passing state.
For a lot of devs, this idea might set off alarm bells. Test maintenance has gotten a bad rap thanks to open source frameworks like Selenium and Cypress and their derivatives. In these frameworks, if you didn’t write the tests, they take some effort to decipher. And then you have to figure out which selectors in your tests match with which elements in your app. It’s a bit of a slog. And all this assumes you know how to work in these frameworks in the first place. If not, you’re going to wait on a QA engineer to hopefully get your test results to a passing state so you can ship your code.
In fact, we have customers who specifically switched to Rainforest away from those frameworks because they struggled to maintain their tests and ship fast. With our no-code approach, anyone can look at a test and quickly understand it and update it.
This quick video follows along as Rainforest test automation downloads and installs Brave browser on desktop – you can see that every test step is in easily-understandable English:
Where to do test maintenance
The Rainforest platform has a branching system that allows our different teams to make updates to the test suite without stepping on each other’s toes. We have several CI/CD pipelines in our company – for the frontend and backend codebases, for example – that all share the same tests. So, committing test changes to a branch and merging when we’re done allows us to avoid collisions and delays during test maintenance.
Usually, if the required updates are minor, we’ll commit these changes directly to main. If there’s a more time-consuming refactor required (like when shipping a major update), we’ll make the changes on a branch so we don’t block other dev teams.
Debugging test failures
It’s not enough to just run e2e tests as part of the release process – failed tests must block the release pipeline. Ignoring or disabling failed tests (which can be tempting when there’s pressure to ship) invites a vicious circle that undermines product quality: when there are consistently failed tests that get ignored, people rightfully doubt the utility of the test suite, which leads to less investment in it. The test suite deteriorates, and more bugs make it to prod.
A single disabled test might not break your app, but it begins to normalize behavior that eventually does have meaningful negative consequences. Put another way: A single hole may not sink your boat, but many holes will. When there’s one hole, fixing the problem is manageable. But when we have too many, the boat will take on water faster than we can plug the holes.
Therefore, as a fundamental practice of software testing hygiene, fix broken tests right away. Your test suite is only useful if your team keeps it up-to-date.
If you’ve got a test that’s failing because of a known bug that you continue to ignore, it might be time to ask yourself if it’s time to remove that test from your suite. (Remember our rule of thumb: Only add test coverage for flows you’d fix right away if they broke.)
Categorize each test failure
We get a Slack notification to let us know when an automated test run has failed. When that happens, the first step is always to review the test failures and categorize them so they can be resolved. (Rainforest includes options for categorizing test failures and assigning them to the right people on your team for resolution.)
Failures tend to fall into one of three categories:
- The test needs to be updated
- There’s a bug
- There are issues with the test environment
1. The test needs to be updated
In this scenario, our code is working as expected and we’ve added or changed some functionality that caused an existing test to fail. As mentioned earlier, this is an easy way to identify tests that need to be updated as a result of product changes.
2. There’s a bug
A bug happens when there’s a problem with the code we’re shipping and the unit tests didn’t catch it. (That’s why it’s important to run e2e tests! We consider them to be integration tests that verify the various service APIs and functionalities covered individually by unit tests all work together properly.)
In this case, we have two options: 1) merge a hotfix or 2) revert the changes.
When to hotfix
Merging a hotfix means we merge an additional change into the code that caused test failures. Hotfixing is a workable option, but you should only consider it if the dev is very confident that it’ll fix the issue without introducing additional problems.
After all, the dev was probably confident in the integrity of the original code that they tried to ship – how can they be certain they’re right about the hotfix? (This is a reflection on the riskiness of hotfixes, not upon the competence of any developer.) The last thing you want to do is compound the issue and create more complexity you then have to untangle.
Only consider a hotfix if:
- the “fix” is a very small code change that another dev can quickly review,
- the code change has very low complexity,
- you’re sure the fix won’t have any undesired consequences or side-effects, and
- there are no other outstanding issues that could cause failures. For example, if there were multiple test failures during the run, you need to be sure the fix will address all of the failures.
When to revert
If you’re not deeply confident in a hotfix, the best course is to revert the code. It’s simple to do, and you can try to ship the code again later once a fix has been applied.
When reverting, we just merge in a “revert” PR. But this means the code has to go through the whole release pipeline again. While this may seem a bit annoying, it’s a necessary step to protect the app: after the revert has been merged, we need to run our entire test suite to make sure the code was properly reverted and everything is back to a stable state.
3. There are issues with the test environment
Not infrequently, we speak with customers who deal with test failures stemming from a flaky staging or QA environment. We run into these issues, ourselves.
It’s ideal to make these environments mirror the production environment as much as possible, but it’s not always practical. We’re often willing to invest more time and money into production, but non-production environments simply need to be good enough to get the job done. That’s why prod and non-prod environments can and do differ in terms of performance, data seeding, network connectivity, and other variables.
So some amount of test failures due to environmental factors are expected. In these cases, you can often resolve these failures by simply rerunning the failed tests. (At Rainforest, we save time by re-running failed tests automatically.)
When non-production environments cause a meaningful amount of test failures, it’s worthwhile to improve the state of those environments. The upfront costs may not be appetizing, but they’ll pay for themselves in how much faster you’re able to release code.
When bugs are found on production
Inevitably, users will find bugs in production. We’ll never have 100% test coverage on every possible user interaction, so it’s only a matter of time until a user finds a novel combination of clicks and keyboard strokes that breaks your application.
When this happens, the flow is simple:
- file a bug ticket,
- fix the bug, and
- add test coverage to make sure users never see this bug again.
If you’re shipping a bug fix, always add test coverage for it. (If the bug was worth fixing, it’s worth making sure it never escapes to prod, again.) However, the type of test depends on the nature of the bug – sometimes it’s fine to add unit test coverage instead of automated e2e coverage. Either way, it’s the dev’s responsibility since they’re the one in the best position to decide.
Conclusion
Determining what environments you need, how they should be configured, what workflow is best for your development team, and all the other nuances that come with shipping code can be tricky. Regardless of how you decide to implement these things, it’s always important to maintain high product quality standards.
The practices I’ve outlined in this article can be a lot to absorb, especially if you’re setting up a CI/CD pipeline for the first time. If nothing else, remember these five fundamental rules:
- Plan test coverage as part of feature planning. Only test what you’d fix right away.
- Add test coverage for new functionality before your users can access it.
- Run a regression test suite as part of every release.
- Failed tests always block the release.
- Always keep your tests up-to-date.
Making these policies explicit parts of your software development process and DevOps pipelines will help you get to a state of continuous testing that reliably protects your product’s quality as you ship fast and frequently.